Well, you haven't given any details about how you're drawing your movers.
I'm going to guess they may be transparent pictureboxes.
I would say the answer is to not use transparent pictureboxes.
Use the graphics DrawImage method instead (and it should be done in the Paint event of the control containing your background image).
You would trigger the Paint event by calling the .Invalidate method on the control when you've moved the movers so they are redrawn in their new position.
If you could post an example of the type of code you're using, then a more detailed and specific response, possibly modifying your example to show how to draw the images.
But again, since we don't know how you're doing the drawing, I could be giving inapplicable advice.
p.s. I guess the title does say overlapping Pictureboxes, so my guess, while correct, probably didn't really need to be a guess.
So, removing the pictureboxes is what I would recommend.
Private Sub TmrAs8_Tick(sender As Object, e As EventArgs) Handles TmrAs8.Tick
        Dim Hoek1 As Single
        Dim Hoek2 As Single
        Dim Hoek3 As Single

        ' Voor As8 Tussen 0 en 1035 Real
        ' Voor As8 Tussen 131 en 683 PXl
        If ModuloPos(7) >= 0 And ModuloPos(7) < Grens1 Then
            PbAs8.Left = Math.Round((ModuloPos(7) * 0.5333333) + 120) ' 683 - 131 / 1035
            PbAs8.Top = 0 + 150
            Hoek1 = 0
        End If

        'Voor As8 tussen 1471 en 2528 real
        'Voor As8 tussen 171 en 1139 PXL
        If ModuloPos(7) >= Grens2 And ModuloPos(7) <= Grens3 Then
            PbAs8.Left = Math.Round((2630 - ModuloPos(7)) - ((Grens3 - ModuloPos(7)) / 2.15))
            Hoek1 = 180
            PbAs8.Top = 149 + 150
        End If

        'Voor As8 tussen 2528 en 2971
        If ModuloPos(7) > Grens3 And ModuloPos(7) < 2965 Then
            Hoek1 = (((ModuloPos(7) - 2085) * -360) / 886)
            Hoek2 = Hoek1 + 180
            Hoek3 = Hoek1 + 270
        End If

        'Voor As8 tussen 1035(1141) en 1471
        If ModuloPos(7) > Grens1 And ModuloPos(7) < Grens2 Then
            Hoek1 = ((ModuloPos(7) - 1035) * -0.4128440367)
            Hoek2 = Hoek1 + 90
        End If
        'Voor As8 tussen 2971 en 2999.
        If ModuloPos(7) > 2965 And ModuloPos(7) < 2999 Then
            Hoek1 = 0
            PbAs8.Left = Math.Round(((ModuloPos(7) - 2965) + 90))
            PbAs8.Top = 0 + 150
        End If

        ' Dit blijft hetzelfde

        Dim bm_in As New Bitmap(PictureOrg)

        Dim wid As Single = bm_in.Width ' Wid is de breedte van de Bitmap
        Dim hgt As Single = bm_in.Height ' Hgt is de hoogte van de bitmap
        Dim corners As Point() = {
                New Point(0, 0),            ' elke hoek wordt hier bepaald.
                New Point(wid, 0),
                New Point(0, hgt),
                New Point(wid, hgt)}

        Dim cx As Single = wid / 2  'Center X
        Dim cy As Single = hgt / 2      'Center y, Hier wordt het middenpunt van de foto bepaald.
        Dim i As Long
        For i = 0 To 3                  ' Geen idee wat dit doet.
            corners(i).X -= cx
            corners(i).Y -= cy
        Next i

        Dim Theta1 As Single = Hoek1 * Math.PI / 180.0
        Dim Theta2 As Single = Hoek2 * Math.PI / 180.0
        Dim Theta3 As Single = Hoek3 * Math.PI / 180.0

        Dim Sin_Theta1 As Single = Math.Sin(Theta1)
        Dim Cos_Theta1 As Single = Math.Cos(Theta1)
        '
        Dim Sin_Theta2 As Single = Math.Sin(Theta2)
        Dim Cos_Theta2 As Single = Math.Cos(Theta2)

        Dim Sin_Theta3 As Single = Math.Sin(Theta3)
        Dim Cos_Theta3 As Single = Math.Cos(Theta3)

        Dim X As Single
        Dim Y As Single
        For i = 0 To 3
            X = corners(i).X
            Y = corners(i).Y
            corners(i).X = X * Cos_Theta1 + Y * Sin_Theta1
            corners(i).Y = -X * Sin_Theta1 + Y * Cos_Theta1
        Next i

        Dim xmin As Single = corners(0).X
        Dim ymin As Single = corners(0).Y
        For i = 1 To 3
            If xmin > corners(i).X Then xmin = corners(i).X
            If ymin > corners(i).Y Then ymin = corners(i).Y
        Next i
        For i = 0 To 3
            corners(i).X -= xmin
            corners(i).Y -= ymin
        Next i
        Dim bm_out As New Bitmap(CInt(-2 * xmin), CInt(-2 *
            ymin))
        Dim gr_out As Graphics = Graphics.FromImage(bm_out)

        ReDim Preserve corners(2)

        gr_out.DrawImage(bm_in, corners)

        PbAs8.Image = bm_out


        If ModuloPos(7) > Grens1 And ModuloPos(7) < Grens2 Then
            If Hoek1 < 0 And Hoek1 > -90 Then
                PbAs8.Left = Math.Round((-Sin_Theta1 * 49) + 680)
                PbAs8.Top = Math.Round(95 - (Cos_Theta1 * 95)) + 150
            End If
            If Hoek1 < -90 And Hoek1 > -180 Then
                PbAs8.Top = Math.Round(90 + (-Sin_Theta2 * 55)) + 150
                PbAs8.Left = Math.Round((Cos_Theta2 * 49) + 680)
            End If
        End If

        If ModuloPos(7) > Grens3 And ModuloPos(7) < 2965 Then
            If Hoek1 > -270 And Hoek1 < -180 Then
                PbAs8.Left = (Sin_Theta2 * 85) + 85
                PbAs8.Top = (Cos_Theta2 * 50) + 95 + 150
            End If
            If Hoek1 > -360 And Hoek1 < -270 Then
                PbAs8.Left = 80 - (Cos_Theta3 * 80)
                PbAs8.Top = 90 - (-Sin_Theta3 * 90) + 150
            End If
        End If

    End Sub
/////////////////////////////////////////////////////////////////
This is the code for one out of 10 Movers.. I get the position from another program..
the most of this code i got from the internet.. it works good.. But i think it can be better.
Last edited by DesPurpleLightning; Nov 10th, 2015 at 06:55 AM.
I can't really take time to look at it right now as I'm at work, but I can tell obviously that it is using the "plgblt" type call to DrawImage in order to do the rotation.
Using the Graphics built in transform matrix would actually make this code a lot simpler, but it will take a bit of analysis to map the coordinates you're using for the parallelogram paradigm, to a single coordinate that you can center and rotate the Mover on.
As a quick fix for the existing code without changing the paradigm completely, I would try setting all the picturebox's Visible property to false, and draw the image on the form myself in the Paint Event.
Are these pictureboxes in a panel, or on a form?
Assuming a Form, If you call Invalidate() or Me.Invalidate() at the end of each sub, the form should refresh by triggering the Paint Event handler.
In the paint event handler, you should be able to use the position of all the pictureboxes you are moving invisibly around, and DrawImage to draw the image yourself on your form. The advantage, is that you're not using the false transparency of the picturebox, you will be drawing with the true transparancy that is in your image.
Code:
  Private Sub Form1_Paint(sender As Object, e As System.Windows.Forms.PaintEventArgs) Handles Me.Paint
    Dim g As Graphics = e.Graphics
    g.DrawImage(PbAs6.Image, PbAs6.Location)
    g.DrawImage(PbAs7.Image, PbAs7.Location)
    g.DrawImage(PbAs8.Image, PbAs8.Location)
  End Sub
The background you see is a panel. Which is on another panel.
So what do i need to do for make sure it refresses itself
Thank you alot for taking your time to help me
Well i tried it.. But it flickers like hell.. My background.. The panel.. disapears and reapears,
On the positive side.. The overlapping is fixed..
Side note:
I'm a student, and i'm making my thesis in automatisation.
I got this code in it
Code:
 Protected Overrides ReadOnly Property CreateParams() As CreateParams
        Get
            Dim cp As CreateParams = MyBase.CreateParams
            cp.ExStyle = cp.ExStyle Or &H2000000
            Return cp
        End Get
    End Property
Without this.. It doesn't flicker.. But Without it they don't even move.
Also i got another question.
Can i make this a some sort of a function block? So i can use it multiple times?
Because if i know change something in the formula, i need to change it 10 times.
Last edited by DesPurpleLightning; Nov 10th, 2015 at 06:55 AM.
For the Flashing, the simplest thing would be to use a large Picturebox to hold your background image since updates to a picturebox are double-buffered by default, so any drawing done in the Paint Event will be done in a memory buffer and the screen updated in one update.
You can also speed up drawing by not invalidating the whole Picturebox, but only the area that is updated.
And yes, you can pass the picturebox to a function to share common code. You would also probably have to pass an index for your ModuloPos array.
Or you could assign your pictureboxes to an array, so you would only pass the index and use the index to get the proper picturebox and MoudoPos entry.
As an example, I just have some code that will move a couple of pictureboxes back and forth across the form. A large picturebox is used to hold the background image
and we invalidate a portion of it to update drawing the image of the non-visible pictureboxes.
You may not want to only invalidate a portion of the image if your movers are going to move in a manner that might leave a piece of them behind (some part of the old image is outside the bounds of the new location of the picturebox).
You can't run this as is, because it will expect a large picturebox and two smaller pictureboxes of the same name to already exist on the form. Also some "background" image should be loaded into the big picturebox so we see the transparent images moving over it.
Probably not to hard to setup if you really wanted, but the point is really just to see example code showing one way of adding existing pictureboxes to an array, and using a common index to reference the pictureboxes and related data through the arrays. The code uses loops in both the Paint event and the timer tick event to access the pictureboxes.
vb.net Code:
Public Class Form1
Private WithEvents t As New Windows.Forms.Timer
Dim pbs(9) As PictureBox 'An array to hold the existing pictureboxes
Dim Directions(9) As Integer 'to hold movement value for each picturebox
Private Sub Form1_Load(sender As System.Object, e As System.EventArgs) Handles MyBase.Load
'The pictureboxes are not Visible (.Visible set False in the IDE)
Dim b As New Bitmap(PbAs8.Width, PbAs8.Height) 'Create a bitmap so the picturebox has something to show
Using g As Graphics = Graphics.FromImage(b)
g.ScaleTransform(8, 8)
g.DrawLine(Pens.Red, 1, 1, 6, 6)
End Using
PbAs7.Image = b
PbAs8.Image = b
'A class to hold all the related items, and then an array of that class
'would be better than parallel arrays, but your current implementation is
'basically parallel arrays, I think.
pbs(6) = PbAs7 'Assign the pictureboxes to an array
pbs(7) = PbAs8
Directions(6) = 2 'Assign movement variables to a parallel array
Directions(7) = 3
t.Interval = 10
t.Start()
End Sub
Private Sub MovePBox(idx As Integer) 'common routine to move a picturebox
Dim Direction As Integer = Directions(idx)
With pbs(idx)
.Left += Direction
If .Left < 0 Then
.Left = -.Left
Direction = -Direction
ElseIf .Right > 400 Then
Direction = -Direction
.Left += 400 - .Right
End If
Directions(idx) = Direction
PictureBox1.Invalidate(.Bounds) 'Update the image
End With
End Sub
Private Sub t_tick(sender As Object, e As System.EventArgs) Handles t.Tick
For i As Integer = 6 To 7 'Move our two pictureboxes
MovePBox(i)
Next
End Sub
Private Sub PictureBox1_Paint(sender As Object, e As System.Windows.Forms.PaintEventArgs) Handles PictureBox1.Paint
Dim g As Graphics = e.Graphics
For i As Integer = 6 To 7 'Draw our two picturebox images on the background image
g.DrawImage(pbs(i).Image, pbs(i).Location)
Next
End Sub
End Class
Last edited by passel; Nov 10th, 2015 at 02:28 PM.
Edit 1: Appearently it doesn't work if i change the background to a picturebox. And my movers vanish..
Edit 2: My program is just breaking.. doing really weird stuff..
Edit 3: If the overlapping is fixed.. then i'll try to shorten my program.
Edit 4: Somehow i worked.. But it is alot slower.. Apparently i can do this sort of thing with XNA?
This should make it better? But it won't install properly..
Last edited by DesPurpleLightning; Nov 12th, 2015 at 06:55 AM.
So, you put the background in a picturebox And you moved the drawing code from the Form's Paint event to the Picturebox's Paint event, and are doing Invalidate on the Picturebox?
Also, I don't know what your modeling process is. Before I assume you had multiple timers, and each mover was moved independently.
Updating the window with each mover's movement is a much slower way to do the drawing updates.
The way most games and simulations would work is that you would
1. Update all the movers, without redrawing the screen.
2. Initialize the background (doing invalidate() should do that. When you get the paint event, all drawing done in the last paint event should be gone and you have a "clean" background image to draw on)
3. Draw all the movers in their present position.
Repeat again, starting at 1.
That way, if you have 30 movers, you aren't updating the window 30 times. You model the movement of the 30 movers, then update the window once to show the current state.
Don't have time for any examples, but the requirements for this task should be well within the capability of regular WinForm's drawing capabilities.
Keep in mind that i'm that good in programming..
I'm happy with the result that i got from you.
I'm calculating the position of every mover every 100ms. And i'm doing this still 10 times..
If i make a function so i only do it once. But repeat it 10 times. Will this be faster?
Code:
   Private Sub PbXTS_Paint(sender As Object, e As PaintEventArgs) Handles PbXTS.Paint

        Dim g As Graphics = e.Graphics
        g.DrawImage(PbAs1.Image, PbAs1.Location)
        g.DrawImage(PbAs2.Image, PbAs2.Location)
        g.DrawImage(PbAs3.Image, PbAs3.Location)
        g.DrawImage(PbAs4.Image, PbAs4.Location)
        g.DrawImage(PbAs5.Image, PbAs5.Location)
        g.DrawImage(PbAs6.Image, PbAs6.Location)
        g.DrawImage(PbAs7.Image, PbAs7.Location)
        g.DrawImage(PbAs8.Image, PbAs8.Location)
        g.DrawImage(PbAs9.Image, PbAs9.Location)
        g.DrawImage(PbAs10.Image, PbAs10.Location)
        PbXTS.Invalidate(Bounds)


    End Sub
Also i have another question.. I have actually a million questions.. But you know
I gave an example of one way to set up a control array to make looping the code easier back in post #6.
You can create an array of the control type you want, in this case TextBox, and then assign a reference to your textboxes to that array when you start up.
You can then reference the textboxes using the array reference, or the control reference, whichever is convenient.
Code:
'In your form's declaration area
  Private TxtModulos() As TextBox


'In your form load event
   TxtModulos = {TxtModulo1, TxtModulo2, TxtModulo3, TxtModulo4, TxtModulo5, TxtModulo6, TxtModulo7, TxtModulo8, TxtModulo9, TxtModulo10}

'And in your code
  For i as Integer = 0 to 9
    TxtModulos(i).Text = Math.Round(ModuloPos(i))
  Next
'
'
'
Originally Posted by DesPurpleLightning
...
I'm calculating the position of every mover every 100ms. And i'm doing this still 10 times..
If i make a function so i only do it once. But repeat it 10 times. Will this be faster?
I'm not quite sure what you mean here, but I would have a single timer that ticked at 100ms (in truth, that will probably be 109ms so you will probably be updating at around 9.2 hz, not 10 hz, but being off by about 10% may not be an issue with what you're doing).
So, in the Single Timer's Tick Event, I would
1. Calculate the new position of every mover.
2. Invalidate the Picturebox so it redraws the movers at the new locations
3. Update any other GUI controls like textboxes.
Step 3 could probably be included as part of step 1.
The important part would be to avoid doing any invalidation in your position calculations.
Only doing the invalidation once, will mean you refresh your image at about 10 hz, whereas if you cause an invalidation as part of you individual, you could potentially be causing the screen to update 100 times per second instead of 10.
But that would be more likely if you had 10 different timers, as it looked like your original post's code seemed to indicate. The window updates could "sneak" in between the various timer ticks.
If you update all 10 positions one after the other within a single timer event, then the window refreshes are not going to happen in that string of processing because your code doesn't exit out of the event handler between updates, so the window can't process a OnPaint message. Multiple invalidations would combined and result in only one Paint event (ideally), but it would be best to design your code (in most scenarios) to only trigger one invalidate to refresh the window, not multiple ones.
Which also brings me to the following code.
Originally Posted by DesPurpleLightning
...
Code:
   Private Sub PbXTS_Paint(sender As Object, e As PaintEventArgs) Handles PbXTS.Paint

        Dim g As Graphics = e.Graphics
        g.DrawImage(PbAs1.Image, PbAs1.Location)
        g.DrawImage(PbAs2.Image, PbAs2.Location)
        g.DrawImage(PbAs3.Image, PbAs3.Location)
        g.DrawImage(PbAs4.Image, PbAs4.Location)
        g.DrawImage(PbAs5.Image, PbAs5.Location)
        g.DrawImage(PbAs6.Image, PbAs6.Location)
        g.DrawImage(PbAs7.Image, PbAs7.Location)
        g.DrawImage(PbAs8.Image, PbAs8.Location)
        g.DrawImage(PbAs9.Image, PbAs9.Location)
        g.DrawImage(PbAs10.Image, PbAs10.Location)
        PbXTS.Invalidate(Bounds)

    End Sub
That seems like it would cause major issues, and I'd be surprised if it worked very well at all.
You essentially have a circular reference (fortunately not recursive), that should cause Paint events for the picturebox to be continually generated as fast as Windows will process them.
You just got done updating the picturebox with all your new drawing, and the last line says to invalidate all that work and redraw the picturebox again.
In fact, Bounds refers to the Form's Bounds, so by definition is probably larger than the bounds of your picturebox, and depending on where the form is on the desktop may be just odd, causing some portions of the picturebox to not be included in the invalidation.
Remove that line from that code, and add it like I said, to your timer code after you've calculated all the new positions (i.e. step 2).
Also, remove the Bounds argument, just invalidate the whole picturebox.
PbXTS.Invalidate()
Last edited by passel; Nov 12th, 2015 at 12:15 PM.
AMAZING
I made a function.. I replaced the Invalidate..
And it works really really smooth.
Thank you!
Edit 1:
Next thing is that the movers i draw with graphics aren't on the front.
Is there any way i can bring drawn images to the front of another Picturebox.
Because if i send the Conveyor belt to the back.. Its behind the background.
Edit 2:
Nevermind i found it I needed to draw the bottle first then te movers..
But my program is acting weird. It resetted all my background pictures.. that i use
as a button.
And the bottle doesn't take PbBottleFill.Location as a drawing.. the drawed image is
lower then the picturebox
And the conveyor belt draws it 2 times.. I'm confused
Edit 3:
I'm thinking to start a new project and make it again.. because i think there are alot of weird thing in the
configuration going on.
Edit 4: H
Here is the code that i use know.. a colleague helped me with the function..
And it worked out pretty nice,
Code:
 'Berekenen en plaatsen van de assen.
    Private Sub Calc(ByRef PbAs As PictureBox, ByVal ModuloPos As Integer)
        Dim Hoek1 As Single
        Dim Hoek2 As Single
        Dim Hoek3 As Single

        'grenzen
        Dim Grens1 As Integer = 1035
        Dim Grens2 As Integer = 1471
        Dim Grens3 As Integer = 2528
        Dim Grens4 As Integer = 2971
        'Offset
        Dim TopOffset As Integer = 150
        ' Voor As1 Tussen 0 en 1035 Real
        ' Voor As1 Tussen 131 en 683 PXl
        If ModuloPos >= 0 And ModuloPos < Grens1 Then
            PbAs.Left = Math.Round((ModuloPos * 0.5333333) + 120) ' 683 - 131 / 1035
            PbAs.Top = 0 + TopOffset
            Hoek1 = 0
        End If

        'Voor As1 tussen 1471 en 2528 real
        'Voor As1 tussen 171 en 1139 PXL
        If ModuloPos >= Grens2 And ModuloPos <= Grens3 Then
            PbAs.Left = Math.Round((2630 - ModuloPos) - ((Grens3 - ModuloPos) / 2.15))
            Hoek1 = 180
            PbAs.Top = 149 + TopOffset
        End If

        'Voor As1 tussen 2528 en 2971
        If ModuloPos > Grens3 And ModuloPos < 2965 Then
            Hoek1 = (((ModuloPos - 2085) * -360) / 886)
            Hoek2 = Hoek1 + 180
            Hoek3 = Hoek1 + 270
        End If

        'Voor As1 tussen 1035(1141) en 1471
        If ModuloPos > Grens1 And ModuloPos < Grens2 Then
            Hoek1 = ((ModuloPos - 1035) * -0.4128440367)
            Hoek2 = Hoek1 + 90
        End If
        'Voor As1 tussen 2971 en 2999.
        If ModuloPos > 2965 And ModuloPos < 2999 Then
            Hoek1 = 0
            PbAs.Left = Math.Round(((ModuloPos - 2965) + 90))
            PbAs.Top = 0 + TopOffset
        End If

        ' Dit blijft hetzelfde

        Dim bm_in As New Bitmap(PictureOrg)

        Dim wid As Single = bm_in.Width ' Wid is de breedte van de Bitmap
        Dim hgt As Single = bm_in.Height ' Hgt is de hoogte van de bitmap
        Dim corners As Point() = {
                New Point(0, 0),            ' elke hoek wordt hier bepaald.
                New Point(wid, 0),
                New Point(0, hgt),
                New Point(wid, hgt)}

        Dim cx As Single = wid / 2  'Center X
        Dim cy As Single = hgt / 2      'Center y, Hier wordt het middenpunt van de foto bepaald.
        Dim i As Long
        For i = 0 To 3                  ' Geen idee wat dit doet.
            corners(i).X -= cx
            corners(i).Y -= cy
        Next i

        Dim Theta1 As Single = Hoek1 * Math.PI / 180.0
        Dim Theta2 As Single = Hoek2 * Math.PI / 180.0
        Dim Theta3 As Single = Hoek3 * Math.PI / 180.0

        Dim Sin_Theta1 As Single = Math.Sin(Theta1)
        Dim Cos_Theta1 As Single = Math.Cos(Theta1)
        '
        Dim Sin_Theta2 As Single = Math.Sin(Theta2)
        Dim Cos_Theta2 As Single = Math.Cos(Theta2)

        Dim Sin_Theta3 As Single = Math.Sin(Theta3)
        Dim Cos_Theta3 As Single = Math.Cos(Theta3)

        Dim X As Single
        Dim Y As Single
        For i = 0 To 3
            X = corners(i).X
            Y = corners(i).Y
            corners(i).X = X * Cos_Theta1 + Y * Sin_Theta1
            corners(i).Y = -X * Sin_Theta1 + Y * Cos_Theta1
        Next i

        Dim xmin As Single = corners(0).X
        Dim ymin As Single = corners(0).Y
        For i = 1 To 3
            If xmin > corners(i).X Then xmin = corners(i).X
            If ymin > corners(i).Y Then ymin = corners(i).Y
        Next i
        For i = 0 To 3
            corners(i).X -= xmin
            corners(i).Y -= ymin
        Next i
        Dim bm_out As New Bitmap(CInt(-2 * xmin), CInt(-2 *
            ymin))
        Dim gr_out As Graphics = Graphics.FromImage(bm_out)

        ReDim Preserve corners(2)

        gr_out.DrawImage(bm_in, corners)

        PbAs.Image = bm_out

        If ModuloPos > Grens1 And ModuloPos < Grens2 Then
            If Hoek1 < 0 And Hoek1 > -90 Then
                PbAs.Left = Math.Round((-Sin_Theta1 * 49) + 680)
                PbAs.Top = Math.Round(95 - (Cos_Theta1 * 95)) + TopOffset
            End If
            If Hoek1 < -90 And Hoek1 > -180 Then
                PbAs.Top = Math.Round(90 + (-Sin_Theta2 * 55)) + TopOffset
                PbAs.Left = Math.Round((Cos_Theta2 * 49) + 680)
            End If
        End If
        If ModuloPos > Grens3 And ModuloPos < 2965 Then
            If Hoek1 > -270 And Hoek1 < -180 Then
                PbAs.Left = (Sin_Theta2 * 85) + 85
                PbAs.Top = (Cos_Theta2 * 50) + 95 + TopOffset
            End If
            If Hoek1 > -360 And Hoek1 < -270 Then
                PbAs.Left = 80 - (Cos_Theta3 * 80)
                PbAs.Top = 90 - (-Sin_Theta3 * 90) + TopOffset
            End If
        End If

    End Sub
    Private Sub TmrAssen_Tick(sender As Object, e As EventArgs) Handles TmrAssen.Tick
        Calc(PbAs1, ModuloPos(0))
        Calc(PbAs2, ModuloPos(1))
        Calc(PbAs3, ModuloPos(2))
        Calc(PbAs4, ModuloPos(3))
        Calc(PbAs5, ModuloPos(4))
        Calc(PbAs6, ModuloPos(5))
        Calc(PbAs7, ModuloPos(6))
        Calc(PbAs8, ModuloPos(7))
        Calc(PbAs9, ModuloPos(8))
        Calc(PbAs10, ModuloPos(9))


        PbXTS.Invalidate()

    End Sub
    Private Sub PbXTS_Paint(sender As Object, e As PaintEventArgs) Handles PbXTS.Paint
        Dim g As Graphics = e.Graphics

        g.DrawImage(PbBottleFill.Image, PbBottleFill.Location)

        g.DrawImage(PbAs1.Image, PbAs1.Location)
        g.DrawImage(PbAs2.Image, PbAs2.Location)
        g.DrawImage(PbAs3.Image, PbAs3.Location)
        g.DrawImage(PbAs4.Image, PbAs4.Location)
        g.DrawImage(PbAs5.Image, PbAs5.Location)
        g.DrawImage(PbAs6.Image, PbAs6.Location)
        g.DrawImage(PbAs7.Image, PbAs7.Location)
        g.DrawImage(PbAs8.Image, PbAs8.Location)
        g.DrawImage(PbAs9.Image, PbAs9.Location)
        g.DrawImage(PbAs10.Image, PbAs10.Location)
        '  g.DrawImage(PbTranspo*****d.Image, PbTranspo*****d.Location)
    End Sub
I'm sorry for the dutch sentences..
Last edited by DesPurpleLightning; Nov 13th, 2015 at 11:51 AM.
Oké.. I Remade my whole project... without my "Stopmotion". Because i think it screwed everything up.
If i build now my project it only takes litteraly a second.
With my old one it suddenly took about half a minut.
So there was something really wrong in it.
But here is my question..
I have 12 pictures of a bottle that fills slowly up.
How can i make it like a stopmotion. On a descend way.
Probable i need to use graphics.. because i want transparentcy
I can't really take time to look at it right now as I'm at work, but I can tell obviously that it is using the "plgblt" type call to DrawImage in order to do the rotation.
Using the Graphics built in transform matrix would actually make this code a lot simpler, but it will take a bit of analysis to map the coordinates you're using for the parallelogram paradigm, to a single coordinate that you can center and rotate the Mover on....
I've been busy so didn't get back to you in time. Since you were kind of starting from scratch, I though showing you how to draw using the transform matrix I mentioned in my second post could be useful, but you've worked out the parallelogram version already.
I'm getting ready for work, but spent a little time before heading out to put together a drawing with matrix transforms version, so it may still be useful in the future to get familiar with how it works.
Since I have to get going, not a real detailed description, but since you've posted the new code, I've pulled some of your variable names into this example to perhaps see where they correlate, e.g. Hoek for Angle and Grens1 to 4 for the four transition points in he motion where the track changes from linear motion to circular motion or back.
The main idea behind this approach is moving a reference point (the center of a circle) along the center inside your track.
As you move your reference point with your mover position, you draw the mover out on the perimeter of the circle.
Initially, you are moving from left to right, the angle is 0, so you draw the mover out at the top of the circle (at 0 degrees, with 0 degrees rotation).
When you reach the right end. The reference circle stops moving, and you swing the mover around the right side of the circle (0 to 180 degrees, with the same rotation).
Now you're moving right to left, and drawing the mover at the bottom of the circle with 180 degree rotation.
Then at the left side, stop the circle, and swing the mover around the left side of the circle (180 to 360 degrees).
That is essentially what you are doing, and what I am doing, but you have a lot more calculation involved to calculate the first point of a parallelogram, then calculate the other two points based on fixed angles relative to the first. You then redraw your image in a separate bitmap, then draw that bitmap to the Picturebox.
My code uses the Drawing Matrix to transform the coordinate system to put (0,0) at the point where the UpperLeft corner of the mover image needs to be, and the coordinate system is rotated so that when the image is drawn it is rotated at the desired angle without having to redraw the bitmap image at that rotation ourselves, i.e. the image is alway drawn at 0,0, because the coordinate system has been moved and rotated.
g.DrawImage(nozzelbmp, 0, 0)
Code:
      'Move the center of the coordinate system (with rotation) to the movers upperLeft corner)
      g.TranslateTransform(X, CenterY)  'Move to the center of the circle based on ModuloPos
      g.RotateTransform(Hoek)           'Rotate by the angle associated with this position
      g.TranslateTransform(-16, -(CircRadius + 26))  '-16,-26 offset from center of nozzel rotation to topLeft
      g.DrawImage(nozzelbmp, 0, 0)
One thing, between every drawing of a mover, the coordinate system has to be restored back to 0,0 being in its normal default position so we have a known starting point.
This is done by saving the drawing context (the state of the graphics object and its matrix transform) before changing the coordinate system, and restoring it after we're done, drawing the mover.
Code:
    Dim gc As Drawing2D.GraphicsContainer = g.BeginContainer
'... drawing code
      g.EndContainer(gc)
There are many ways to go about drawing this, and this is just an example of one approach.
Here is the complete code. I just screen captured your image, and cleaned it up some, and a mover image (which I called nozzle).
I added a trackbar to move a reference position through the range 0 to 1251 (based on the number of pixels around the track at this drawing size).
I just made a loop to draw however many movers would fit on the track with 25 pixel spacing just so you can see "worse" case (most drawn objects) moving around the track. I'll attach the project so you have the images and controls I used, already in a (vb.Net 2010) project.
Code:
Public Class Form1
  Dim nozzelbmp As New Bitmap(My.Resources.Nozzle)
  Dim CenterY As Integer = 253
  Dim Circ1Pos As New Point(80, CenterY)
  Dim Circ2Pos As New Point(514, CenterY)
  Dim CircRadius As Integer = 61
  Dim CircToCircDist As Integer = 434
  Dim CircPeriDist As Integer = CInt(Math.Round(CircRadius * Math.PI))
  Dim HoekDelta As Single = 180.0F / CircPeriDist

  Dim Grens1 As Integer = CircToCircDist
  Dim Grens2 As Integer = Grens1 + CircPeriDist
  Dim Grens3 As Integer = Grens2 + CircToCircDist
  Dim Grens4 As Integer = Grens3 + CircPeriDist

  Private Sub Form1_Load(sender As System.Object, e As System.EventArgs) Handles MyBase.Load
    nozzelbmp.MakeTransparent()
  End Sub

  Private Sub DrawModulo(g As Graphics, ModuloPos As Integer)
    Dim gc As Drawing2D.GraphicsContainer = g.BeginContainer
    Dim X As Integer    'Point between Circ1 and Circ2
    Dim Hoek As Single
    If ModuloPos >= 0 And ModuloPos <= Grens4 Then  'check full range so only need to check one side in block
      If ModuloPos < Grens1 Then
        X = Circ1Pos.X + ModuloPos
        Hoek = 0

      ElseIf ModuloPos < Grens2 Then
        X = Circ2Pos.X
        Hoek = (ModuloPos - Grens1) * HoekDelta

      ElseIf ModuloPos < Grens3 Then
        X = (Circ2Pos.X + Grens2) - ModuloPos
        Hoek = 180

      Else 'must be Circ1 Perimeter
        X = Circ1Pos.X
        Hoek = 180 + (ModuloPos - Grens3) * HoekDelta
      End If

      'Move the center of the coordinate system (with rotation) to the movers upperLeft corner)
      g.TranslateTransform(X, CenterY)  'Move to the center of the circle based on ModuloPos
      g.RotateTransform(Hoek)           'Rotate by the angle associated with this position
      g.TranslateTransform(-16, -(CircRadius + 26))  '-16,-26 offset from center of nozzel rotation to topLeft
      g.DrawImage(nozzelbmp, 0, 0)
      g.EndContainer(gc)
    End If
  End Sub

  Private Sub TrackBar1_Scroll(sender As System.Object, e As System.EventArgs) Handles TrackBar1.Scroll
    PictureBox1.Invalidate()
  End Sub

  Private Sub PictureBox1_Paint(sender As Object, e As System.Windows.Forms.PaintEventArgs) Handles PictureBox1.Paint
    For i As Integer = 0 To 1251 Step 25
      DrawModulo(e.Graphics, (TrackBar1.Value + i) Mod 1252)
    Next
  End Sub
End Class
Last edited by passel; Nov 16th, 2015 at 09:59 AM.
...
But here is my question..
I have 12 pictures of a bottle that fills slowly up.
How can i make it like a stopmotion. On a descend way.
Probable i need to use graphics.. because i want transparentcy
Since the rest of the system shouldn't be moving while the bottle is filling,
when you fill the bottle, you can skip the position calculation portion of the code and just select a different bottle image before you invalidate, that way with each timer tick you see the bottle filling up.
You can make the drawing a bit more efficient by just invalidating an area around the bottle image when you're filling so the whole window doesn't have to update.
But since you probably normally draw the whole window at the frequency you want, and it works, then you may not want to add the extra code, just go ahead and invalidate the whole picturebox as you usually do.
As for translucency, you need to change the Alpha values of the area you want to be translucent (I'm assuming the liquid).
Can't go into details now, work to do, but if you had a couple of images of the bottle you could attach with the liquid partially filled and full, then maybe later we can come up with options.
I didn't know the range 0 to 3000, perhaps didn't look at your code close enough to deduce that, but you can just use a simple conversion factor to convert from the 0 to 3000 scale, into whatever is used in the drawing, for instance.
Code:
'Add after the setting of Grens4
  Dim PosToLogical As Double = Grens4 / 3000     'ModuloPos as a fixed scale 0 to 3000, so covert to logical

'Then in the Drawing routine, convert the passed ModuloPos into the scale used by the drawing
'and use the LocalPos everywhere that ModuloPos was used before (9 places)
    Dim LocalPos As Integer = CInt(ModuloPos * PosToLogical)
Full revised code:
Code:
Public Class Form1
  Dim nozzelbmp As New Bitmap(My.Resources.Nozzle)
  Dim CenterY As Integer = 253
  Dim Circ1Pos As New Point(80, CenterY)
  Dim Circ2Pos As New Point(514, CenterY)
  Dim CircRadius As Integer = 61
  Dim CircToCircDist As Integer = 434
  Dim CircPeriDist As Integer = CInt(Math.Round(CircRadius * Math.PI))
  Dim HoekDelta As Single = 180.0F / CircPeriDist

  Dim Grens1 As Integer = CircToCircDist
  Dim Grens2 As Integer = Grens1 + CircPeriDist
  Dim Grens3 As Integer = Grens2 + CircToCircDist
  Dim Grens4 As Integer = Grens3 + CircPeriDist
  Dim PosToLogical As Double = Grens4 / 3000     'ModuloPos as a fixed scale 0 to 3000, so covert to logical

  Private Sub Form1_Load(sender As System.Object, e As System.EventArgs) Handles MyBase.Load
    nozzelbmp.MakeTransparent()
  End Sub

  Private Sub DrawModulo(g As Graphics, ModuloPos As Integer)
    Dim gc As Drawing2D.GraphicsContainer = g.BeginContainer
    Dim X As Integer    'Point between Circ1 and Circ2
    Dim Hoek As Single
    Dim LocalPos As Integer = CInt(ModuloPos * PosToLogical)

    If LocalPos >= 0 And LocalPos <= Grens4 Then  'check full range so only need to check one side in block
      If LocalPos < Grens1 Then
        X = Circ1Pos.X + LocalPos
        Hoek = 0

      ElseIf LocalPos < Grens2 Then
        X = Circ2Pos.X
        Hoek = (LocalPos - Grens1) * HoekDelta

      ElseIf LocalPos < Grens3 Then
        X = (Circ2Pos.X + Grens2) - LocalPos
        Hoek = 180

      Else 'must be Circ1 Perimeter
        X = Circ1Pos.X
        Hoek = 180 + (LocalPos - Grens3) * HoekDelta
      End If

      'Move the center of the coordinate system (with rotation) to the movers upperLeft corner)
      g.TranslateTransform(X, CenterY)  'Move to the center of the circle based on ModuloPos
      g.RotateTransform(Hoek)           'Rotate by the angle associated with this position
      g.TranslateTransform(-16, -(CircRadius + 26))  '-16,-26 offset from center of nozzel rotation to topLeft
      g.DrawImage(nozzelbmp, 0, 0)
      g.EndContainer(gc)
    End If
  End Sub

  Private Sub TrackBar1_Scroll(sender As System.Object, e As System.EventArgs) Handles TrackBar1.Scroll
    PictureBox1.Invalidate()
  End Sub

  Private Sub PictureBox1_Paint(sender As Object, e As System.Windows.Forms.PaintEventArgs) Handles PictureBox1.Paint
    For i As Integer = 0 To 3000 Step 60
      DrawModulo(e.Graphics, (TrackBar1.Value + i) Mod 3000)
    Next
  End Sub
End Class
When you say you want to resize, are we just talking about scaling (i.e. zooming) the picture bigger or smaller,
or do you want to create conveyor lines of different lengths?
If I had put the conveyor line in its own image, it would only take a couple of lines to allow moving the conveyor around any where you want, and to rotate it to whatever orientation you wanted.
You could zoom the image to make it smaller or larger (say you wanted to show several conveyors in a building diagram, then zoom in to one of them to see it in detail).
Be aware that you are not permitted to upload executables (which includes .dll and .ocxs), but to upload a file you have to select the "Go Advanced" button below the Reply window. Then a little ways down the page should be a maintain attachments area.
I don't know if there is a minimum number of posts before you're allowed to attach a file, I don't believe there is.
I mean with resizing.. That i make the background as big as my screen is. But i had to re do it already 2 times.
There is no logic in the formulas i use... i needed to change every value.. test it.. change it.. test it.. until i found it
was good enough.. But with your formula.. it should always be on the perfect place.
Can you make a drawing where i can see where you took the values from..
Code:
 Dim CenterY As Integer = 253
  Dim Circ1Pos As New Point(80, CenterY)
  Dim Circ2Pos As New Point(514, CenterY)
  Dim CircRadius As Integer = 61
  Dim CircToCircDist As Integer = 434
  Dim CircPeriDist As Integer = CInt(Math.Round(CircRadius * Math.PI))
  Dim HoekDelta As Single = 180.0F / CircPeriDist
Like these onces..
Here are the pictures i actually use btw
Last edited by DesPurpleLightning; Nov 16th, 2015 at 10:56 AM.
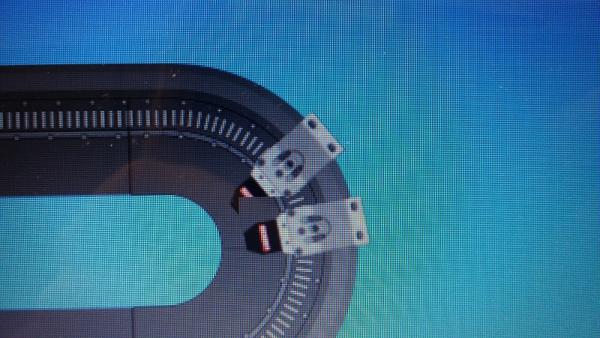
Ok, used your XTS_Background as a diagram to explain the values you mentioned above.
Also, as another example, added your two images to the project, but modified the project to not have a background image in the picturebox.
This example just draws the track (I call it conveyor) and the movers.
This example shows placing the conveyor at an arbitrary spot in the picturebox (defined by the point Conveyor.X and Conveyor.Y)
This reference point also corresponds to the center of Circle1, so since that Position in Conveyor coordinates is (0,0), it makes Circle1's center coordinate (0,0).
That means the CenterY value is 0 in this example, regardless of where the Conveyor is drawn.
Added a timer to just move the Movers continually around the track.
You can change the Conveyor's location (i.e. also the Circle1's center) by dragging with the Left Mouse on the picturebox.
If you drag horizontally back and forth with the Right mouse button, the angle the Conveyor is draw at is changed.
And, perhaps for adjusting for different window sizes, and example of zooming the size of the drawing is demonstrated by dragging left and right with the Center Mouse Button. (If you don't have a center mouse button, you can try to drag with both left and right down, but that won't always work).
Checking for a shift key down could be added so you could use the left or right button in combination with shift to do the scaling.
p.s. I attached the image separately, but I'm not sure how you download it. It is shown reduced here. But fortunately, a copy of it in original form is in the Resources directory of the solution, file name "XTS_BackGround_800_RefPoints.png".
I also cropped your track file down to closely fit the track in the example program, "XTS_BackGround_800_Cropped.png".
Last edited by passel; Nov 16th, 2015 at 08:12 PM.
Can you maybe put the code in a function.. So i can make my 10 movers..
Maybe its easier for me to take over the code that works 100% for me..
Instead that i need to change it.. Because i'm not that great at finding out how to
change your code..
Also... The touch panel is 800*600 pixels.. thats why my background is 800 pixels width..
The reason it has borders.. is because i wanted to have a bigger surface so i can put around the
XTS a simulation of bottles and conveyor belts..
And the project i wanted to upload is to big they say..
Ow.. and the maximum speed of the movers are 4m/s.. so they can make a 4/3 of a circle in a second.
I figured out how to use your code
But now it flickers alot
Code:
  Private Sub DrawModulo(g As Graphics, ModuloPos As Integer)
        Dim gc As Drawing2D.GraphicsContainer = g.BeginContainer
        Dim X As Integer    'Point between Circ1 and Circ2
        Dim Hoek As Single
        Dim LocalPos As Integer = CInt(ModuloPos * PosToLogical)

        If LocalPos >= 0 And LocalPos <= Grens4 Then  'check full range so only need to check one side in block
            If LocalPos < Grens1 Then
                X = Circ1Pos.X + LocalPos
                Hoek = 0

            ElseIf LocalPos < Grens2 Then
                X = Circ2Pos.X
                Hoek = (LocalPos - Grens1) * AngleDelta

            ElseIf LocalPos < Grens3 Then
                X = (Circ2Pos.X + Grens2) - LocalPos
                Hoek = 180

            Else 'must be Circ1 Perimeter
                X = Circ1Pos.X
                Hoek = 180 + (LocalPos - Grens3) * AngleDelta
            End If

            'Move the center of the coordinate system (with rotation) to the movers upperLeft corner)
            g.TranslateTransform(X, CenterY)  'Move to the center of the circle based on ModuloPos
            g.RotateTransform(Hoek)           'Rotate by the angle associated with this position
            g.TranslateTransform(-16, -(CircRadius + 26))  '-16,-26 offset from center of nozzel rotation to topLeft
            g.DrawImage(MoverBmp, 0, 0)
            g.EndContainer(gc)
        End If
    End Sub
    Private Sub TmrMovers_Tick(sender As Object, e As EventArgs) Handles TmrMovers.Tick
        PnlBottlingPlant.Invalidate()
    End Sub
    Private Sub PnlBottlingPlant_Paint(sender As Object, e As PaintEventArgs) Handles PnlBottlingPlant.Paint
        e.Graphics.TranslateTransform(XtsPos.X, XtsPos.Y)
        e.Graphics.RotateTransform(0)
        e.Graphics.ScaleTransform(1, 1)
        With XtsLeftTopOffset
            e.Graphics.DrawImage(XTSBmp, .X, .Y)
        End With
        Dim i As Integer
        For i = 0 To 9 Step 1
            DrawModulo(e.Graphics, iModuloPos(i))
        Next

    End Sub
This is the code i use
Well nevermind.. I figured it out.. u used a picture box for the whole screen.. thats why i didn't noticed
Edit 5:
And btw: Hoek = angle in dutch.. Grens = Border in dutch.. And the XTS is a machine from beckhoff
I get the opportunity to work with it.
Edit6:
I noticed that there is little problem with the alignment.
When the movers stops in the middle
it should be right at modulopos 500..
But now its less then that.
Because the zero point is at the first modula.
A little bit to the right on the straight bit.
Can you maybe fix your formula with the "Grens"
Thanks
Many thanks for your help !
Last edited by DesPurpleLightning; Nov 17th, 2015 at 05:02 AM.
If you need a particular position of the 0 to 3000 scale to line up with a particular position around the track, you should probably just provide an offset to the localPos calculation to shift the movers around the track. I would try adding 14 to shift the movers 14 pixels clockwise around the track. Add a Mod function to ensure the position doesn't go outside the Grens4 range.
Dim LocalPos As Integer = CInt((ModuloPos * PosToLogical) + 14) Mod Grens4
You might want 15, or some other number to trim the position. Since you didn't post all the code, I'm not sure what all your values are, like XtsPos for instance.
If you're using the full size bitmap (800x600) with the track as the Image for the picturebox, you wouldn't need to draw the track. And since you don't need to rotate or scale, your Paint code could probably look like this (and since I might not have 10 movers, I just changed the loop to adapt to the size of the array, rather than use 9).
Code:
  Private Sub PnlBottlingPlant_Paint(sender As Object, e As PaintEventArgs) Handles PictureBox1.Paint 'PnlBottlingPlant.Paint
    e.Graphics.TranslateTransform(XtsPos.X, XtsPos.Y)
    '   e.Graphics.RotateTransform(0)              'Get rid of all these commented out lines, they are not needed
    '   e.Graphics.ScaleTransform(1, 1)
    'With XtsLeftTopOffset
    '  e.Graphics.DrawImage(XTSBmp, .X, .Y)
    'End With
    Dim i As Integer
    For i = 0 To iModuloPos.Count - 1 '9 Step 1
      DrawModulo(e.Graphics, iModuloPos(i))
    Next
  End Sub
Mod does an Integer divide and returns the remainder.
For instance, your ModuloPos values should be in the range of 0 to 2999, so if you're adding an offset to your position, you want to make sure the resulting value stays in that range.
If the ModuloPos = 2990 and you add 20 to the position, the result is 3010 which is outside the range. You want to wrap the position back to 10.
ModuloPos = (ModuloPos + 20) Mod 3000
does the Integer divide (internally) and returns the remainder 3010 \ 3000 = 1 with a remainder of 10, the mod function returns the 10, which is what we want.
You could do this instead
Code:
  ModuloPos += 20
  If ModuloPos >= 3000 Then
    ModuloPos -= 3000
  End If
So, in the case "mod Grens4", Grens4 is set to the total length of the track in units of pixel.
If the value is greater than or equal to Grens4 it is wrapped back to the proper position value within the valid track position range.
By the way, when I see "Oww...", in English, I tend to interpret that as an exclamation of pain, like you just hit your thumb with a hammer.
I'm trying to think of something that may translate what you're going for, but not coming up with anything.
Perhaps,
Ahh...that's useful!
or
Aha...that's useful!
Probably the first, more than the second, but not sure if Ahh... is expressive enough for your intent.
Ahaa.. I know what you mean.. But i type what i say.. I made a owww.. sound.. So thats why i didn't type ahhh.. Because I
didn't say aha.. But ok.
I have an idea.. that i want to make. The problem is.. i don't know how. i give up the idea a few weeks ago because i wouldn't know
how to start with that.. But maybe with your help.. It may can happen.
So the idea is to reverse the program.
I want to touch the mover on the screen and dragg it around and while it gets dragged around on the screen it moves in real to..
Would this be possible to do in visual studio? Can i dragg the mover so it sends a value between 0 and 3000 to TwinCAT. Can it recognize that its in a curve..
Is there anyway to do that?
I did give up that idea a long time ago.. but maybe you can make it work.
Also if you want my full program.. I can send it to you in an email?
But you would need TwinCAT to really make it work
Thanks anyway
Edit 1: Bottles.zip
These are the bottles that i use..
i have no idea how to combine it with your code.
Edit 2:
Dus "Mod" stand for Modulo?
Would make sence
Edit 3:
So for making it look like the bottle is filling i did the following.
Code:
The Declaration:

    Dim FillingBottleBmp As New Bitmap(My.Resources.Bottle_1)
    Dim FillingBottlePos As Point = New Point(204, 407)
    Dim FillStep As Integer


The Drawing:
 Private Sub PbXTSBackGround_Paint(sender As Object, e As PaintEventArgs) Handles PbXTSBackGround.Paint
 ==>e.Graphics.DrawImage(FillingBottleBmp, FillingBottlePos)
        e.Graphics.TranslateTransform(XtsPos.X, XtsPos.Y)
        With XtsLeftTopOffset
            e.Graphics.DrawImage(XTSBmp, .X, .Y)
        End With
        Dim i As Integer
        For i = 0 To 9 Step 1
            DrawModulo(e.Graphics, iModuloPos(i) Mod 3000)
        Next

    End Sub

Choosing which bottle to show:
Private Sub TmrFillingBottle_Tick(sender As Object, e As EventArgs) Handles TmrFillingBottle.Tick
        Select Case FillStep
            Case 0
                FillingBottleBmp = My.Resources.Bottle_1
                FillStep += 1
            Case 1
                FillingBottleBmp = My.Resources.Bottle_3
                FillStep += 1
            Case 2
                FillingBottleBmp = My.Resources.Bottle_5
                FillStep += 1
            Case 3
                FillingBottleBmp = My.Resources.Bottle_7
                FillStep += 1
            Case 4
                FillingBottleBmp = My.Resources.Bottle_9
                FillStep += 1
            Case 5
                FillingBottleBmp = My.Resources.Bottle_11
                FillStep += 1
            Case 6
                FillingBottleBmp = My.Resources.Bottle_13
                FillStep += 1
            Case 7
                FillingBottleBmp = My.Resources.Bottle_15
                FillStep += 1
            Case 8
                FillingBottleBmp = My.Resources.Bottle_17
                FillStep += 1
            Case 9
                FillingBottleBmp = My.Resources.Bottle_19
                FillStep += 1
            Case 10
                FillingBottleBmp = My.Resources.Bottle_21
                FillStep = 0

        End Select
    End Sub
The big problem is that.. when i'm connected with the machine.. The time it takes to fill the bottle doesn't match with the
time i set the timer to.
If i don't connect with my machine it goes with the time the timer is set to.
Otherwise it doesn't.
So i'm really confused whats going on.
Last edited by DesPurpleLightning; Nov 23rd, 2015 at 07:53 AM.


 Reply With Quote


 I needed to draw the bottle first then te movers..