|

-
Mar 25th, 2005, 06:17 PM
#3
Testing the Installtion
Testing the Installtion
The installation and configuration is now complete and you should now be able to connect to the server. Fire up the command prompt via the Start Menu:
Start Menu --> Programs --> Accessories --> Command Prompt
Now enter the following command line to connect to your database server using the MySql client:
Code:
mysql -h localhost -u root -W -p
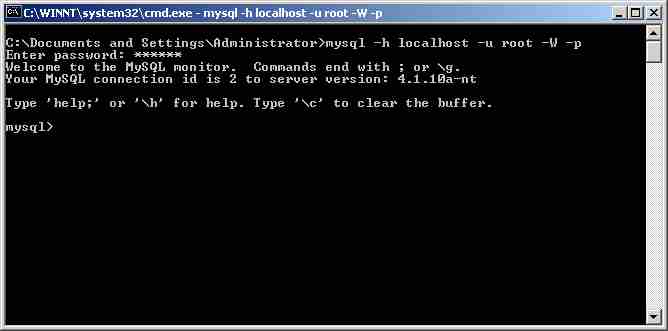
You should see the above if the installation has been successful. You should note the purpose of the following command line switches used to connect to the server:
-h : the host name you are connecting with
-u : the user name you are connecting with
-p : tells the client to prompt for a password before attempting to connect.
-W : you'll recall from step 9 of the installation that you disabled TCP/IP for the server. This switch tells the client to connect using a named pipe instead of via TCP/IP
Finding your way Around
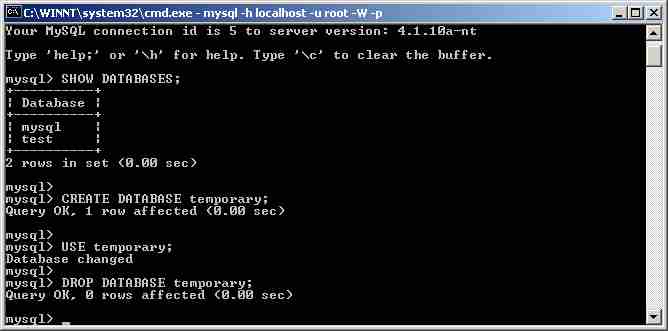
You have now connected to the database server with the MySql client which was included with the installation. It is useful to get a feel for the command line interface by entering a few queries. All queries must end in a semi colon:
SHOW DATABASES; - Will show all the databases on the server. The MySql database should only ever be accessed by the root MySql user as it contains all the information including passwords and permissions on how can access other databases.
CREATE DATABASE [dbname]; - Will create a new database with the specified name.
USE [dbname]; - Will change the database to that with the name specified. Once you have selected a database you can create and modify tables and index and execute queries on that database.
DROP DATABASE [dbname]; - Will delete the database with the name specified. As user unfriendly as it may seem, there is no “Press Y to confirm” when you use this. Use it with caution as there is no going back once you have dropped a database.
N.b: on a Windows system, database, column and table names are not case sensitive due to the fact the Windows NTFS and FAT 32 files systems are not case sensitive. However, UNIX file systems are case sensitive and hence MySql; and, as many web hosts will host their database on UNIX systems, it is advisable you use the following naming conventions to ensure your applications do not break when you port them to your web host:
- Names should always be lower case
- Do not use mixed case, instead separate words in names by with an underscore e.g. `customer_addresses'
Securing the Installation
If you have followed the instructions above then you already have a secure MySql server installation. By only allowing connections via named pipes, only programs running on the local computer can access the server. Its now time to prepare and secure the server for use by PHP.
- Creating a Database for PHP
The first thing to do is create a database for exclusive use by PHP. It is a good idea to name your databases consistently and I will use a “php” prefix for all my databases. We shall call ours `php_general`. Use the following query to do this:
Code:
CREATE DATABASE php_general;
- Grant access to the PHP database.
At present only the root user can access the newly created database. Although it is still possible to connect and use the database as the root user, this method is insecure. Should a compromise give a malicious user access to the database they will be able, not only to modify the current database but also execute commands on your system and / or create files. We therefore need to create a user and grant that user access to only the php database with the permissions they require.
This query will create a user called `php` which can connect to the database server using the password `secret`. This user will be able to add and drop new tables, insert data, update data and extract data from the tables.
Code:
USE mysql;

GRANT ALTER,CREATE,DELETE, UPDATE,
      DROP,INDEX,SELECT,INSERT ON php_general.*
      TO 'php'@'localhost' IDENTIFIED BY 'secret';

FLUSH PRIVILEGES;
- Connect to the new database
Finally we should test to check whether or not we can connect to the database. Type exit at the MySql prompt to return to the command prompt and reconnect as the PHP user, using the following. Note the extra switch -D which allows you to select a database at the time of connecting.
Code:
mysql -h localhost -u php -D php_general -W -p
Last edited by visualAd; Dec 18th, 2005 at 03:59 PM.
 Posting Permissions
- You may not post new threads
- You may not post replies
- You may not post attachments
- You may not edit your posts
-
Forum Rules
|
Click Here to Expand Forum to Full Width
|


 Reply With Quote