Hi Steve Grant, thanks for the control you provided. I seemed to have seen this control that year, but its edges were not smooth, and there are obvious jagged (not anti-aliasing), so I didn't use it at the time.
Only to 99% looking as the original you posted, but don't want to invest much more time with the "fine-tuning"
of the Gradient- and Alpha-Params (if it's not satisfying, just play around and change these on your own).
Here is the Form-Code:
Code:
Option Explicit

Private BtnColor As Long

Private Sub Form_Load()
  AutoRedraw = True
  BackColor = &HF0F0F0

  BtnColor = &H995833
  CreateAquaBtnSrf(111, 45, BtnColor, BackColor).DrawToDC hDC, 10, 10
  CreateAquaBtnSrf(111, 111, BtnColor, BackColor).DrawToDC hDC, 10, 83

  BtnColor = &H583399
  CreateAquaBtnSrf(111, 25, BtnColor, BackColor).DrawToDC hDC, 130, 10
  CreateAquaBtnSrf(55, 55, BtnColor, BackColor).DrawToDC hDC, 130, 83
End Sub

Private Function CreateAquaBtnSrf(dx, dy, Color, Optional ByVal BackColor& = -1) As cCairoSurface
  Set CreateAquaBtnSrf = Cairo.CreateSurface(dx, dy)

  Dim CC As cCairoContext, Pat As cCairoPattern
  Set CC = CreateAquaBtnSrf.CreateContext
      CC.SetLineWidth 1
  If BackColor <> -1 Then CC.Paint 1, Cairo.CreateSolidPatternLng(BackColor)

  'we start with the filling (horiz. gradient first, then vertical, all using the same path-def below)
  DefineButtonPath CC, dx - 2, dy - 2 'the -2's leave a bit of space for the shadow, which is drawn later
  Set Pat = Cairo.CreateLinearPattern(0, 0, dx, 0)
      Pat.AddColorStop 0, Color, 1, 0.8
      Pat.AddColorStop dy / dx * 0.3, Color, 1, 1.8
      Pat.AddColorStop 1 - dy / dx * 0.3, Color, 1, 1.8
      Pat.AddColorStop 1, Color, 1, 0.8
  CC.Fill True, Pat
  Set Pat = Cairo.CreateLinearPattern(0, 0, 0, dy)
      Pat.AddColorStop 0, Color, 0.5, 0.4
      Pat.AddColorStop 0.33, Color, 0.5, 0.6
      Pat.AddColorStop 0.62, Color, 0.5, 1.4
      Pat.AddColorStop 0.78, Color, 0.5, 2.4
      Pat.AddColorStop 0.93, Color, 0.5, 1.8
      Pat.AddColorStop 1, vbWhite, 0.9
  CC.Fill , Pat

  DefineButtonPath CC, dx - 2, dy - 2 'our "default-Path" again
  CC.Clip 'but here only used for clipping
    'the real drawing starts here, but ensures only the "shine" on top
    CC.RoundedRect -0.05 * dx, -dy * 1.25, (dx - 1) * 1.1, 1.5 * dy, dy / 2, True
    Set Pat = Cairo.CreateLinearPattern(0, 0, 0, dy * 0.25)
        Pat.AddGaussianStops_TwoColors vbWhite, vbWhite, 0.4, 0.12, gpLess 'white with only a variance in alpha
    CC.Fill , Pat
  CC.ResetClip

  'we render two "shadow-borders" now (the first one at the full extend of the area, but nearly invisible)
  DefineButtonPath CC, dx, dy, vbBlack, 0.12
  DefineButtonPath CC, dx - 1.15, dy - 1, vbBlack, 0.36 'the second one a bit more visible (area 1 pixel smaller again)

  DefineButtonPath CC, dx - 2, dy - 2, Color, 0.8, 0.2 'the final surrounding Border in the (darkened) Color of the Control
End Function

Private Sub DefineButtonPath(CC As cCairoContext, ByVal dx#, ByVal dy#, Optional ByVal StrokeColor& = -1, Optional ByVal Alpha# = 1, Optional ByVal Shade# = 1)
  Dim Ry As Double, Rx As Double
      Ry = IIf(dy <= dx, dy, dx) / 2 - CC.GetLineWidth
      Rx = 0.88 * Ry 'the radi in the below used "EllipticArc-call are not symmetrical (as e.g. in a Rounded-Rectangle)
      dy = dy - CC.GetLineWidth

  CC.MoveTo Rx + CC.GetLineWidth / 2 + 1, CC.GetLineWidth / 2
    CC.RelEllipticArcTo Rx, Ry, 0, True, False, 0, IIf(dy <= dx, dy, dx) - CC.GetLineWidth
    CC.RelLineTo dx - 2 * Rx - 2 * CC.GetLineWidth, 0
    CC.RelEllipticArcTo Rx, Ry, 0, True, False, 0, CC.GetLineWidth - IIf(dy <= dx, dy, dx)
  CC.ClosePath
  If StrokeColor <> -1 Then CC.Stroke , Cairo.CreateSolidPatternLng(StrokeColor, Alpha, Shade)
End Sub
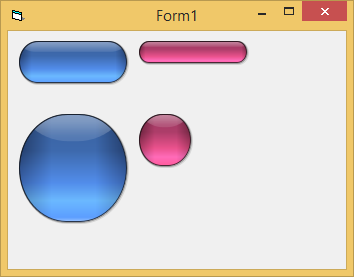
And here what gets produced:
HTH
Olaf
Wonderful. Although Cairo.Drawing is a bit more complicated than VB.GDI, it is much simpler than GDI+. Thank you, Olaf.
Although Cairo.Drawing is a bit more complicated than VB.GDI,...
That's actually not really the case, because - what you usually see when I post Cairo-code,
are solutions for problems which would be impossible (or very difficult) to solve with GDI.
The GDI is a quite old API (with limited drawing-functions - compared to stuff in modern Garphics-libs), so please
take a look at the code which is necessary, to draw a simple rounded Rect (with pure GDI, and no help from the Form):
Code:
Option Explicit

Private Const PS_SOLID As Long = 0

Private Declare Function CreatePen Lib "gdi32" (ByVal nPenStyle As Long, ByVal nWidth As Long, ByVal crColor As Long) As Long
Private Declare Function CreateSolidBrush Lib "gdi32" (ByVal crColor As Long) As Long
Private Declare Function SelectObject Lib "gdi32" (ByVal hDC As Long, ByVal hObject As Long) As Long
Private Declare Function DeleteObject Lib "gdi32" (ByVal hObject As Long) As Long
Private Declare Function RoundRect Lib "gdi32" (ByVal hDC As Long, ByVal X1 As Long, ByVal Y1 As Long, ByVal X2 As Long, ByVal Y2 As Long, ByVal X3 As Long, ByVal Y3 As Long) As Long

Private Sub Form_Load()
  'we use VBs AutoRedraw-Bitmap as the Forms BackBuffer
  Me.AutoRedraw = True
End Sub

Private Sub Form_Click()
  Me.Cls 'clear and prepare for a new drawing
    DrawRoundedRectGDI 50, 50, 250, 150, 25, vbYellow, vbRed, 3
  Set Me.Picture = Me.Image 'bring the BackBuffer to the Front
End Sub

Private Sub DrawRoundedRectGDI(x, y, dx, dy, R, FillColor, BorderColor, LineWidth)
Dim hOldPen As Long, hOldBrush As Long
Dim hPen As Long, hBrush As Long

    hBrush = CreateSolidBrush(FillColor)
    hOldBrush = SelectObject(hDC, hBrush)

    hPen = CreatePen(PS_SOLID, LineWidth, BorderColor)
    hOldPen = SelectObject(hDC, hPen)

    RoundRect hDC, x, y, x + dx, y + dy, R * 2, R * 2

    DeleteObject SelectObject(hDC, hOldPen)
    DeleteObject SelectObject(hDC, hOldBrush)
End Sub
Now compare, how the same simple task is solved with Cairo-Drawing
(which in my opinion reads much nicer code-wise, and is nowhere near as complex or risky with regards to Handle-Leaks):
Code:
Option Explicit

Private CC As cCairoContext

Private Sub Form_Resize()
  'we use a CairoSurface.Context as the Forms BackBuffer and leave the Forms AutoRedraw-Mechanism alone
  Set CC = Cairo.CreateSurface(ScaleX(ScaleWidth, ScaleMode, 3), ScaleY(ScaleHeight, ScaleMode, 3)).CreateContext
End Sub

Private Sub Form_Click()
  CC.Paint 1, Cairo.CreateSolidPatternLng(Me.BackColor) 'clear and prepare for a new drawing
    DrawRoundedRectCairo 50, 50, 250, 150, 25, vbYellow, vbRed, 3
  Set Me.Picture = CC.Surface.Picture 'bring the BackBuffer to the Front
End Sub

Private Sub DrawRoundedRectCairo(x, y, dx, dy, R, FillColor, BorderColor, LineWidth)
  CC.SetLineWidth LineWidth
  CC.RoundedRect x, y, dx, dy, R
    CC.SetSourceColor FillColor
  CC.Fill True
    CC.SetSourceColor BorderColor
  CC.Stroke
End Sub
I guess the reason I've posted this is, to reduce a bit of the potentially existing "cairo surely has to be complex" -angst.
As long as it is only equivalents to the simple GDI-functions you've used before (just nicer due to being antialiased) -
these Functions are all there "right behind the CC.dot->intellisense-Popup" (SelectFont, DrawText, Ellipse, DrawLine etc)
Very useful comparison. There is no truth without comparison. It's time for me to abandon GDI. When I have time, I'll rewrite my RenderWave procedure with Cairo.Drawing. Thank you, Olaf.
Only to 99% looking as the original you posted, but don't want to invest much more time with the "fine-tuning"
of the Gradient- and Alpha-Params (if it's not satisfying, just play around and change these on your own).
Here is the Form-Code:
Code:
Option Explicit

Private BtnColor As Long

Private Sub Form_Load()
  AutoRedraw = True
  BackColor = &HF0F0F0

  BtnColor = &H995833
  CreateAquaBtnSrf(111, 45, BtnColor, BackColor).DrawToDC hDC, 10, 10
  CreateAquaBtnSrf(111, 111, BtnColor, BackColor).DrawToDC hDC, 10, 83

  BtnColor = &H583399
  CreateAquaBtnSrf(111, 25, BtnColor, BackColor).DrawToDC hDC, 130, 10
  CreateAquaBtnSrf(55, 55, BtnColor, BackColor).DrawToDC hDC, 130, 83
End Sub

Private Function CreateAquaBtnSrf(dx, dy, Color, Optional ByVal BackColor& = -1) As cCairoSurface
  Set CreateAquaBtnSrf = Cairo.CreateSurface(dx, dy)

  Dim CC As cCairoContext, Pat As cCairoPattern
  Set CC = CreateAquaBtnSrf.CreateContext
      CC.SetLineWidth 1
  If BackColor <> -1 Then CC.Paint 1, Cairo.CreateSolidPatternLng(BackColor)

  'we start with the filling (horiz. gradient first, then vertical, all using the same path-def below)
  DefineButtonPath CC, dx - 2, dy - 2 'the -2's leave a bit of space for the shadow, which is drawn later
  Set Pat = Cairo.CreateLinearPattern(0, 0, dx, 0)
      Pat.AddColorStop 0, Color, 1, 0.8
      Pat.AddColorStop dy / dx * 0.3, Color, 1, 1.8
      Pat.AddColorStop 1 - dy / dx * 0.3, Color, 1, 1.8
      Pat.AddColorStop 1, Color, 1, 0.8
  CC.Fill True, Pat
  Set Pat = Cairo.CreateLinearPattern(0, 0, 0, dy)
      Pat.AddColorStop 0, Color, 0.5, 0.4
      Pat.AddColorStop 0.33, Color, 0.5, 0.6
      Pat.AddColorStop 0.62, Color, 0.5, 1.4
      Pat.AddColorStop 0.78, Color, 0.5, 2.4
      Pat.AddColorStop 0.93, Color, 0.5, 1.8
      Pat.AddColorStop 1, vbWhite, 0.9
  CC.Fill , Pat

  DefineButtonPath CC, dx - 2, dy - 2 'our "default-Path" again
  CC.Clip 'but here only used for clipping
    'the real drawing starts here, but ensures only the "shine" on top
    CC.RoundedRect -0.05 * dx, -dy * 1.25, (dx - 1) * 1.1, 1.5 * dy, dy / 2, True
    Set Pat = Cairo.CreateLinearPattern(0, 0, 0, dy * 0.25)
        Pat.AddGaussianStops_TwoColors vbWhite, vbWhite, 0.4, 0.12, gpLess 'white with only a variance in alpha
    CC.Fill , Pat
  CC.ResetClip

  'we render two "shadow-borders" now (the first one at the full extend of the area, but nearly invisible)
  DefineButtonPath CC, dx, dy, vbBlack, 0.12
  DefineButtonPath CC, dx - 1.15, dy - 1, vbBlack, 0.36 'the second one a bit more visible (area 1 pixel smaller again)

  DefineButtonPath CC, dx - 2, dy - 2, Color, 0.8, 0.2 'the final surrounding Border in the (darkened) Color of the Control
End Function

Private Sub DefineButtonPath(CC As cCairoContext, ByVal dx#, ByVal dy#, Optional ByVal StrokeColor& = -1, Optional ByVal Alpha# = 1, Optional ByVal Shade# = 1)
  Dim Ry As Double, Rx As Double
      Ry = IIf(dy <= dx, dy, dx) / 2 - CC.GetLineWidth
      Rx = 0.88 * Ry 'the radi in the below used "EllipticArc-call are not symmetrical (as e.g. in a Rounded-Rectangle)
      dy = dy - CC.GetLineWidth

  CC.MoveTo Rx + CC.GetLineWidth / 2 + 1, CC.GetLineWidth / 2
    CC.RelEllipticArcTo Rx, Ry, 0, True, False, 0, IIf(dy <= dx, dy, dx) - CC.GetLineWidth
    CC.RelLineTo dx - 2 * Rx - 2 * CC.GetLineWidth, 0
    CC.RelEllipticArcTo Rx, Ry, 0, True, False, 0, CC.GetLineWidth - IIf(dy <= dx, dy, dx)
  CC.ClosePath
  If StrokeColor <> -1 Then CC.Stroke , Cairo.CreateSolidPatternLng(StrokeColor, Alpha, Shade)
End Sub
And here what gets produced:
HTH
Olaf
Hi Olaf, the above example just drawed the pictue of Aqua-Button but could not make a real Aqua-Buton (Button Control). Because the button control is a rectangle window, I need to make the four corners of the window transparent.
Last edited by dreammanor; Apr 10th, 2018 at 12:45 AM.
Since you are using the RC5 and Cairo already,
it's actually much easier to implement such things in the RC5-Widget-Engine (instead of a VB-UserControl).
Just create a new Class in your Project (name it e.g. cwSimpleButton) -
and start out with the necessary "blank Widget-Content" (I have a template for that, to copy from).
Code:
Option Explicit

Private WithEvents W As cWidgetBase 'W is similarly to the UserControl-term in a VB6-Control-Project

Private Sub Class_Initialize()
  Set W = Cairo.WidgetBase 'instantiate the W-Base-Object
End Sub

Public Property Get Widget() As cWidgetBase: Set Widget = W:          End Property
Public Property Get Widgets() As cWidgets:   Set Widgets = W.Widgets: End Property

Private Sub W_Paint(CC As vbRichClient5.cCairoContext, ByVal xAbs As Single, ByVal yAbs As Single, ByVal dx_Aligned As Single, ByVal dy_Aligned As Single, UserObj As Object)
  'Paint your stuff here, by using the Methods of the CC-Object
End Sub
Now, fill out this "blue-print" by adding concrete stuff, e.g. for a simple "round button" (additions to the above template, marked in magenta):
Code:
Option Explicit

Public Caption As String

Private WithEvents W As cWidgetBase

Private Sub Class_Initialize()
  Set W = Cairo.WidgetBase
      W.BackColor = vbYellow'set a few default-properties on the W-instance
      W.BorderColor = vbRed
End Sub

Public Property Get Widget() As cWidgetBase: Set Widget = W:          End Property
Public Property Get Widgets() As cWidgets:   Set Widgets = W.Widgets: End Property

Private Sub W_Paint(CC As vbRichClient5.cCairoContext, ByVal xAbs As Single, ByVal yAbs As Single, ByVal dx_Aligned As Single, ByVal dy_Aligned As Single, UserObj As Object)
  CC.SetLineWidth 2
  CC.RoundedRect 0, 0, W.Width, W.Height, W.Height / 2, True
  CC.Fill True, Cairo.CreateSolidPatternLng(W.BackColor)
  CC.Stroke False, Cairo.CreateSolidPatternLng(W.BorderColor)

  CC.DrawText 0, 0, W.Width, W.Height, Caption, , vbCenter, 5, 1
End Sub
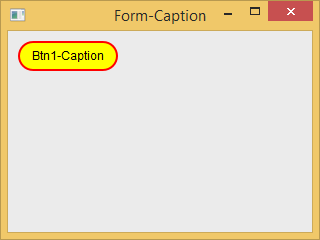
With that in place, a small test will show the following Widget-rendering:
..by using the following Startup-TestCode in a *.bas-Module.
Code:
Option Explicit

Private Btn1 As cwSimpleButton, Btn2 As cwButton

Sub Main()
  Dim Form As cWidgetForm
  Set Form = Cairo.WidgetForms.Create(vbSizable, "Form-Caption", , 320, 240)

  Set Btn1 = Form.Widgets.Add(New cwSimpleButton, "Btn1", 10, 10, 100, 30)
      Btn1.Caption = "Btn1-Caption"

'** alternatively use the pre-defined Button from vbWidgets.dll
'  Set Btn2 = Form.Widgets.Add(New cwButton, "Btn2", 10, 50, 100, 30)
'      Btn2.Caption = "&Btn2-Caption"
'      Btn2.BorderRadius = 15
'      Btn2.Widget.BackColor = vbYellow
'      Btn2.Widget.BorderColor = vbRed
'      Btn2.Widget.FocusColor = vbRed

  Form.Show
  Cairo.WidgetForms.EnterMessageLoop
End Sub


 Reply With Quote