|

-
Mar 25th, 2005, 06:12 PM
#1
PHP Tutorial: Installation
Installing PHP, MySql and Apache on Windows
N.B: This tutorial contains images. Over a dial up connection, it will take approximately 90 seconds to download all supported images.
It is often useful to have an installation of PHP on your local system for testing purposes. This tutorial will show you how to install and configure your own web server with PHP and MySql in a Windows environment. I will also show you how to secure your installation to ensure that no one but you can gain access to it.
Prerequisites
- Make sure you are logged onto your computer using an account with administrative privileges before continuing.
- You may encounter error messages when installing MySql and Apache if you have Microsoft Windows XP service pack 2 installed and have the Internet Connection Firewall enabled. It is safe to ignore these errors, as they are caused when a service attempts to listen for connections on an unsafe network interface.
- You must be running Windows NT, Windows 2000 or Windows XP.
- Before installing Apache, ensure that all other web servers installed on the system, such as IIS have been turned off, otherwise you will be unable to start the web server.
Contents
- Mysql
- Download & Installation
- Testing the Installation
- Finding your way Around
- Securing the Installation
- Apache
- Download & Install
- Testing the Installation
- Finding your way around
- Securing the Installation
- PHP
- Download & Install
- Configuring PHP
- Configuring Apache
- Testing the Installation
- Securing the Installation
- Sources
- Aknowledgments
Last edited by visualAd; Mar 26th, 2005 at 06:20 AM.
-
Mar 25th, 2005, 06:14 PM
#2
Download & Install
MySql
Download & Install
Unlike Microsoft Access, MySql comes in two parts. The database server and the client, which connects to the server.
- Download the latest stable version of MySql server form the MySql website; at the time of writing this was version 4.1.10. Download the Windows Installer version, with an MSI extension. The latest version can be found at the download page on the MySql site: http://dev.mysql.com/downloads/
- Once you have downloaded the MSI file you are ready to install. If you have a version of MySql installed which pre-dates version 4.1.5 then you must first uninstall this.
- The installation wizard will guide you through the install process, when prompted; choose to the typical installation.
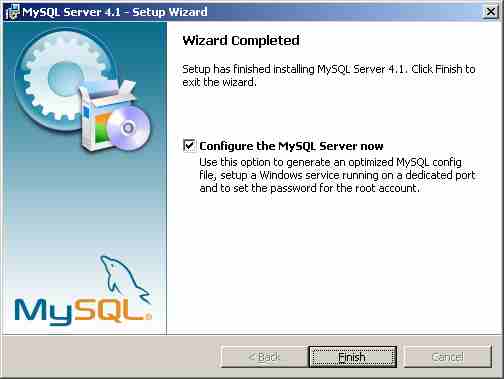
- After the installation you will be taken to the set-up wizard. Although not required, it is advisable that you sign up for a MySql.com account. This will allow you to post user comments on the site and give you an option to sign up to free regular security updates.
- To finish the installation make sure you have selected the “Configure the MySql Server now” option to create an initial configuration.
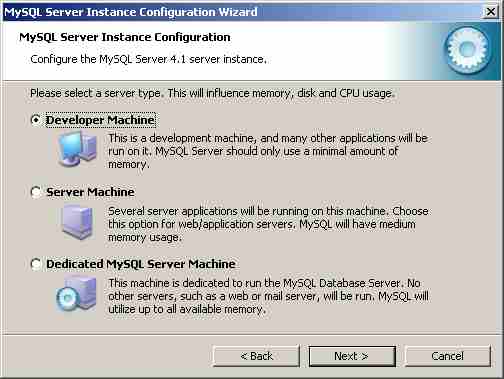
- The server instance configuration wizard will now start. Choose to set up a detailed configuration.
- As this is going to be a test environment and performance is not paramount, choose the developer machine option here.
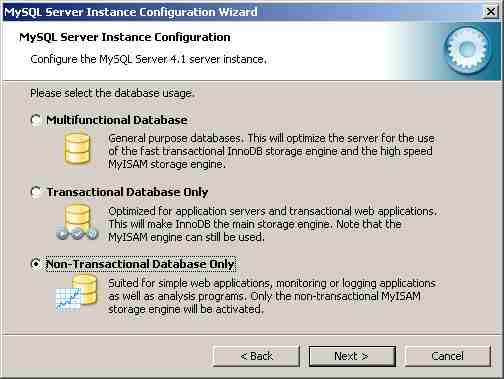
- Unless you have a specific need for a transactional database, choose the non-transactional database only.
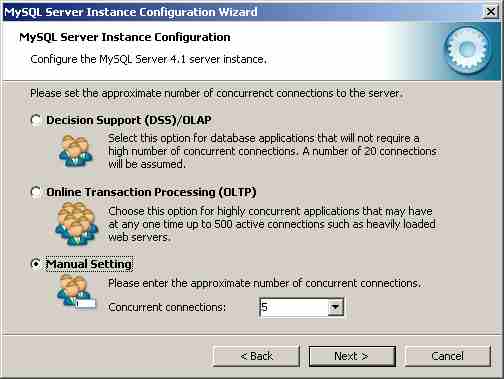
- Again, as this is a development environment you will never have more than 5 simultaneous connections to the database.
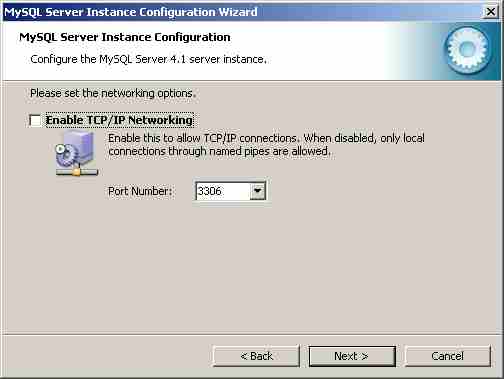
- This is an important step. Do not enable this option, as it will allow connections to your database server from the outside Internet. As we will only be using MySql from PHP which will connect locally there is no need to open the MySql TCP/IP port.
- For the next step select the character set which you use on your PC. For most it will be the default option.
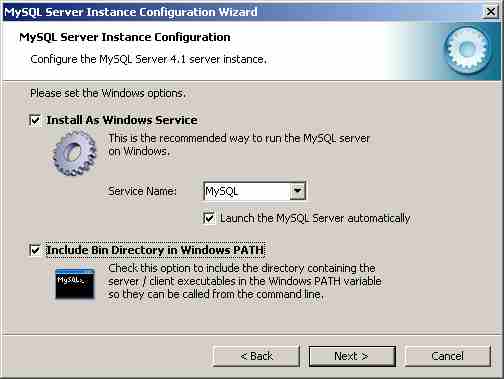
- This is another important step. Here you select whether or not you want to run MySql as a Windows service. When ran as a Windows service, the server will automatically be started with windows and accessible by anyone who logs on to the machine. I recommend you select this option. Also make sure you add the bin directory to the Windows PATH variable, otherwise PHP won't be able to find the mysql libraries when it starts.
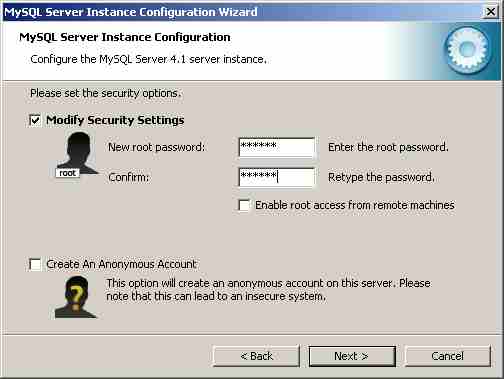
- This step enables you to choose a root MySql user password. MySql server has its own security model which is independent of the Windows system. It is worth noting that the root MySql user has complete access to the database server and for security reasons you should never use this account when working from PHP scripts.
- You are now ready to configure the server. Confirm this and press the execute button to complete the configuration.
Last edited by visualAd; Mar 28th, 2005 at 01:27 PM.
-
Mar 25th, 2005, 06:17 PM
#3
Testing the Installtion
Testing the Installtion
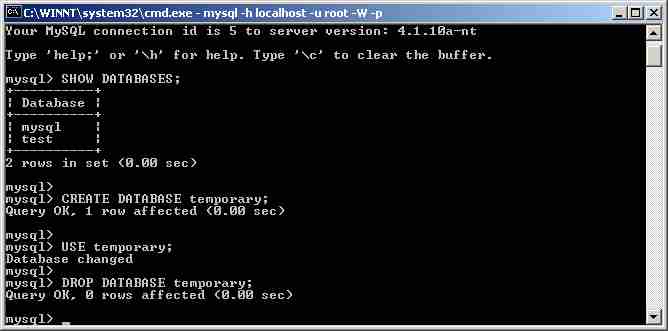
The installation and configuration is now complete and you should now be able to connect to the server. Fire up the command prompt via the Start Menu:
Start Menu --> Programs --> Accessories --> Command Prompt
Now enter the following command line to connect to your database server using the MySql client:
Code:
mysql -h localhost -u root -W -p
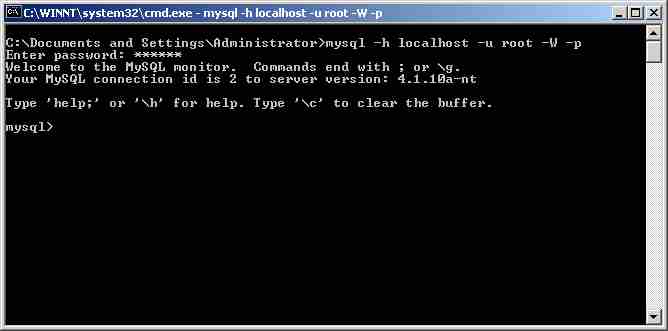
You should see the above if the installation has been successful. You should note the purpose of the following command line switches used to connect to the server:
-h : the host name you are connecting with
-u : the user name you are connecting with
-p : tells the client to prompt for a password before attempting to connect.
-W : you'll recall from step 9 of the installation that you disabled TCP/IP for the server. This switch tells the client to connect using a named pipe instead of via TCP/IP
Finding your way Around
You have now connected to the database server with the MySql client which was included with the installation. It is useful to get a feel for the command line interface by entering a few queries. All queries must end in a semi colon:
SHOW DATABASES; - Will show all the databases on the server. The MySql database should only ever be accessed by the root MySql user as it contains all the information including passwords and permissions on how can access other databases.
CREATE DATABASE [dbname]; - Will create a new database with the specified name.
USE [dbname]; - Will change the database to that with the name specified. Once you have selected a database you can create and modify tables and index and execute queries on that database.
DROP DATABASE [dbname]; - Will delete the database with the name specified. As user unfriendly as it may seem, there is no “Press Y to confirm” when you use this. Use it with caution as there is no going back once you have dropped a database.
N.b: on a Windows system, database, column and table names are not case sensitive due to the fact the Windows NTFS and FAT 32 files systems are not case sensitive. However, UNIX file systems are case sensitive and hence MySql; and, as many web hosts will host their database on UNIX systems, it is advisable you use the following naming conventions to ensure your applications do not break when you port them to your web host:
- Names should always be lower case
- Do not use mixed case, instead separate words in names by with an underscore e.g. `customer_addresses'
Securing the Installation
If you have followed the instructions above then you already have a secure MySql server installation. By only allowing connections via named pipes, only programs running on the local computer can access the server. Its now time to prepare and secure the server for use by PHP.
- Creating a Database for PHP
The first thing to do is create a database for exclusive use by PHP. It is a good idea to name your databases consistently and I will use a “php” prefix for all my databases. We shall call ours `php_general`. Use the following query to do this:
Code:
CREATE DATABASE php_general;
- Grant access to the PHP database.
At present only the root user can access the newly created database. Although it is still possible to connect and use the database as the root user, this method is insecure. Should a compromise give a malicious user access to the database they will be able, not only to modify the current database but also execute commands on your system and / or create files. We therefore need to create a user and grant that user access to only the php database with the permissions they require.
This query will create a user called `php` which can connect to the database server using the password `secret`. This user will be able to add and drop new tables, insert data, update data and extract data from the tables.
Code:
USE mysql;

GRANT ALTER,CREATE,DELETE, UPDATE,
      DROP,INDEX,SELECT,INSERT ON php_general.*
      TO 'php'@'localhost' IDENTIFIED BY 'secret';

FLUSH PRIVILEGES;
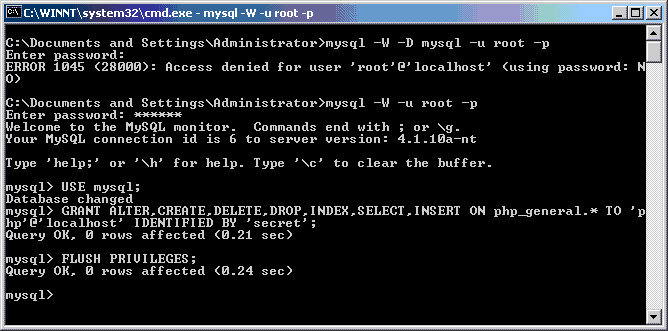
- Connect to the new database
Finally we should test to check whether or not we can connect to the database. Type exit at the MySql prompt to return to the command prompt and reconnect as the PHP user, using the following. Note the extra switch -D which allows you to select a database at the time of connecting.
Code:
mysql -h localhost -u php -D php_general -W -p
Last edited by visualAd; Dec 18th, 2005 at 03:59 PM.
-
Mar 26th, 2005, 05:15 AM
#4
Re: PHP Tutorial: Installation
Apache
Apache is a powerful HTTP web server. A web server enables you to host specific files which can be downloaded via HTTP (Hyper Text Transfer Protocol) and displayed in a web browser. As well as displaying files Apache allows you to invoke programs on the server and have their output (HTML) sent to the web browser. Apache will allow us to execute our PHP scripts. When a request is made for a PHP script Apache will run the PHP executable and feed in the requested script. PHP will process the script and finally Apache will send the output of the PHP executable back to the client who requested it.
Download & Install
N.B: Before installing Apache, ensure that all other web servers installed on the system, such as IIS have been turned off, otherwise you will be unable to start the web server.
- The latest version of Apache can be found at http://httpd.apache.org/download.cgi. At the time of writing, the latest stable version of Apache was version 2.0.53, I will be downloading and using the Windows Installer version.
- After reading the license agreement and the introduction page you will be asked to enter some basic information. Unless you plan to access your server from other computers on your network or the Internet, enter “localhost” in the domain and server name fields. Ensure that the option to run Apache as a service on port 80 is selected, similar to MySql, this will allow Apache to start up with Windows.
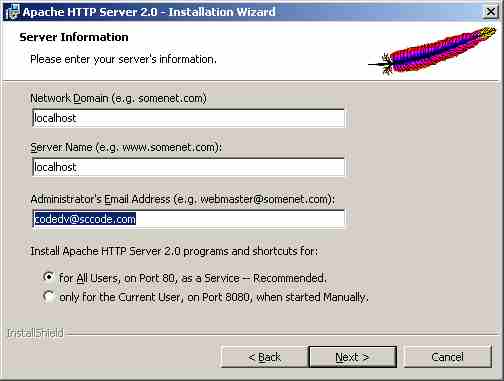
- For the next two steps select the Typical install and confirm the directory you want Apache to be installed in. You are then ready to install Apache.
Testing the Installation
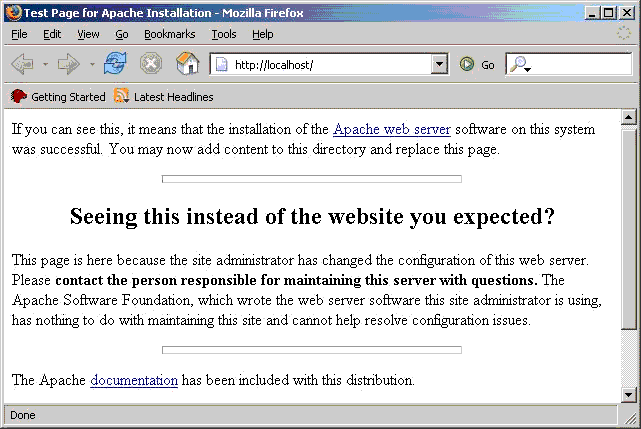
If you have Windows XP Service Pack 2 installed and the Internet Connection Firewall enabled, you may see a warning when Apache starts. This is because it is attempting to listen on port 80 for remote connections originating from any computer, whether it be on the local network or the Internet. I will show you how to disable this in the section on Securing the Apache Installation. To test the installation was successful, open your favourite web browser and enter the following URL:
http://localhost/
You should see the Apache start page. This page will contain a link to a local copy of the Apache manual.
Finding your way around
The root installation directory C:\Program Files\Apache Group\Apache2 contains the following significant sub directories:
bin – this directory contains all Apaches executable files
cgi-bin – contains CGI programs / scripts which are executed by Apache.
htdocs – contains the web pages for your site
conf – contains Apaches configuration files. The main configuration file is called httpd.conf.
Securing the Installation
At this point we want to ensure that our web server is only accessible via the local machine and not to people from outside on the Internet. I strongly recommend that unless you are an advanced user, you follow these steps to prevent outside access.
- Open the web servers main configuration file, httpd.conf. A link to this file can be found in:
Start Menu -> Programs -> Apache HTTP Server -> Configure Apache Server -> Edit the httpd.conf Configuration File
- Find the line:
This line tells the server which TCP port to listen for HTTP connections on. At present is listens on all available network interfaces (i.e: modem, wireless, LAN, etc). We will change this to the loopback interface only, which has the name localhost. This ensures connections only originate from the PC itself:
Code:
Listen localhost:80
- Save and close the configuration file. For the changes to take effect you need to restart the web server. There is again a shortcut in the start menu to restart the web server:
Start Menu -> Programs -> Apache HTTP Sever -> Control Apache Server -> Restart
Last edited by visualAd; Mar 26th, 2005 at 05:26 AM.
-
Mar 26th, 2005, 05:38 AM
#5
Re: PHP Tutorial: Installation
PHP
It is now time to install PHP. After installation, we will need to go back to the Apache configuration file and make some changes so it knows how to deal with PHP files. PHP is an HTML embedded server side scripting language. It allows you to introduce logic to what would otherwise be static web pages and create server side applications.
Download & Install
The latest version of PHP can be found at http://www.php.net/downloads/. At the time of writing there were two stable versions of PHP. PHP 4 and PHP5. For this tutorial we will be downloading the Windows Zip archive of PHP 5.0.3 You'll need to ensure you have a compression utility such as quickZip which can extract zip archives to view this file.
- Open up the ZIP archive and create a directory on your C drive called PHP
- Extract the entire archive into the newly created directory.
You have now installed PHP. The next step is to configure it.
Configuring PHP
Before running PHP for the first time we need to create a configuration file. PHP's configuration file is called php.ini.
- Open the directory C:\PHP
- Rename the file php.ini-dist to php.ini
- Open the php.ini file in a text editor.
- Find the following settings and edit them as follows
Code:
short_open_tag = Off

error_reporting  =  E_ALL

extension_dir = "C:\PHP\ext"

extension = php_mysql.dll <-- remove the (semi colon) ; from the beginning of this line

SMTP = post.demon.co.uk <-- your ISP's web SMTP server address goes here

sendmail_from = [email protected] <-- your email address goes here

mysql.default_socket = mysql

include_path = ".;c:\PHP\PEAR\;C:\Program Files\Apache Group\Apache2\htdocs\"
- To ensure PHP can find the MySql library we need to copy the file libmysql.dll (which can be found in the bin directory of the MySql root installation directory), to the windows directory. Either C:\winnt\ or C:\windows\
The edited PHP file can also be downloaded from here.
Configuring Apache
- You now need to edit the httpd.conf configuration file. Re-open the file as detailed in step 1 of the “Securing Apache” section.
- Add the following lines to the end of your http.conf file:
Code:
### PHP Configuration

LoadModule php5_module "c:/php/php5apache2.dll"

AddType application/x-httpd-php .php

# configure the path to php.ini
PHPIniDir "C:/php"
- To complete the setup restart the Apache server as detailed in step 3 of the “Securing Apache” section.
Testing the Installation
We should now be able to run PHP through the web server and connect to the MySql database server through PHP. Follow these steps to test whether or not the installation of PHP has been successful.
- Open up the root installation directory of the Apache web server.
- Create a file in the htdocs directory called phpinfo.php with the following line:
PHP Code:
<?php phpinfo(); ?>
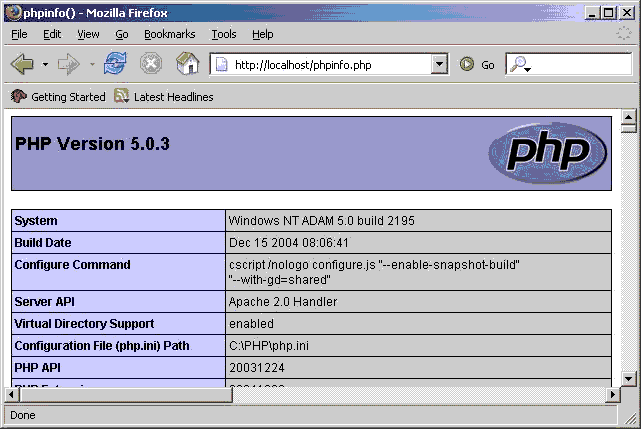
- Open the file via a web browser: http://localhost/phpinfo.php.
The phpinfo page will show information on PHPs configuration, Apache and the environment.
Next we need to write a script to test the database connectivity.
- Open up the MySql client and connect to the php_general database which you created earlier.
- Enter the following queries to create a test table:
Code:
CREATE TABLE test (colname CHAR(25));

INSERT INTO test VALUES ('value1'), ('value2');
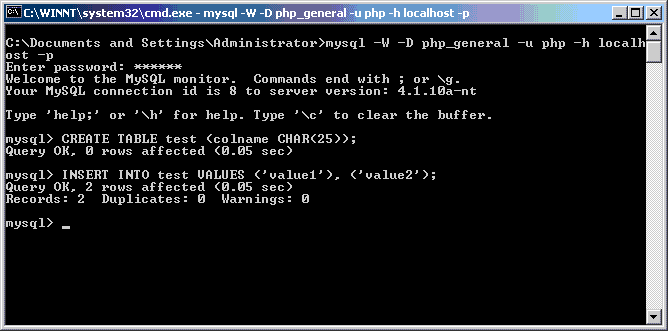
- To display the contents of this table, we need to write a short PHP script. Place the following code in a file called db.php and save it in the htdocs directory of your Apache installation.
PHP Code:
<?php


    $username = 'php';

    $host = '.'; // this forces connection through a named pipe

    $pw = 'secret';


    if (! mysql_connect($host, $username, $pw)) {

    die('Connection error: ' . mysql_error());

    }


          mysql_select_db('php_general');


    $query = 'SELECT colname FROM test';


    if (! $result = mysql_query($query)) {

    die('Query error: ' . mysql_error());

    }

?>

<html>

    <head>

        <title>Test Database Script</title>

    </head>

    <body>

    <table>

        <?php while($row = mysql_fetch_row($result)): // loop through all records?>

        <tr>

            <td><?php echo($row[0]) ?></td>

        </tr>

        <?php endwhile; ?>

    </table>

    </body>

</html>
- Run the script by typing the following URL into your web browser: http://localhost/db.php
Securing the Installation
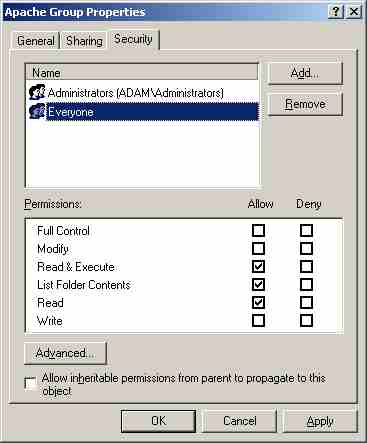
Most of the steps we have already taken to secure our setup also filter through to PHP. Both PHP and Apache will however, run with administrative privileges. This means they will have access to any file on your system. To lock down the installation and ensure that only the Administrator can change the configuration:
- Make the following directories and sub directories read only to everyone except administrators.
C:\Program Files\Apache Group
C:\Program Files\MySql
C:\PHP
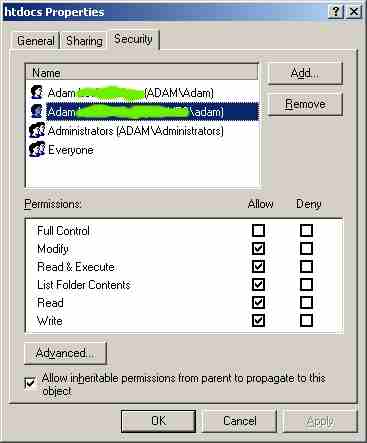
- Make the htdocs directory writeable to users who are allowed to add and change files for the local website.
- To prevent PHP from accessing files it shouldn't we can turn on safe mode and set the open_basedir directive. This will prevent PHP scripts from executing programs and only allow it to open files within the directory set by open_basedir. Open up your php.ini configuration file as detailed in step 4 of “Configuring PHP” and change the following:
Code:
safe_mode = On

open_basedir = "c:\PHP\PEAR\;C:\Program Files\Apache Group\Apache2\htdocs\"

safe_mode_include_dir = ".;c:\PHP\PEAR\;C:\Program Files\Apache Group\Apache2\htdocs\"
- For changes to take effect, restart the Apache web server as detailed in step 3 of the “Securing Apache” section.
Last edited by visualAd; Apr 27th, 2005 at 09:27 AM.
-
Mar 26th, 2005, 06:19 AM
#6
Congratulations
Congratulations, you have now got a complete PHP installation on your system, ready for development of web applications. Good luck.
Copyright: All Rights Reserved By Adam Delves
If you have any comments, questions or suggestions regarding this tutorial please post them here.
Sources
MySql AB – http://www.mysql.com/
Apache Group – http://www.apache.org/
PHP.net - http://www.php.net/
Acknowledgements
Thank you to Manavo11, Pino and NoteMe for proof reading the tutorial.
Last edited by visualAd; May 5th, 2005 at 06:31 AM.
-
Aug 16th, 2008, 01:58 PM
#7
New Member

Re: PHP Tutorial: Installation
Hi , everything worked for me Exept http://localhost/db.php
when i enter
Code:
### PHP Configuration

LoadModule php5_module "c:/php/php5apache2.dll"

AddType application/x-httpd-php .php

# configure the path to php.ini
PHPIniDir "C:/php"
and restart it gets error and shut down appache and dosent start agian.
-
Aug 25th, 2008, 01:38 AM
#8
Re: PHP Tutorial: Installation
If only I were able to read your mind. Unfortunately I cannot, so you are going to have to give me details of this mysterious error.
-
Aug 25th, 2008, 01:39 AM
#9
Re: PHP Tutorial: Installation
P.s: please post this in the discussion thread: http://www.vbforums.com/showthread.php?t=330926
 Posting Permissions
- You may not post new threads
- You may not post replies
- You may not post attachments
- You may not edit your posts
-
Forum Rules
|
Click Here to Expand Forum to Full Width
|


 Reply With Quote